顯示具有 Android 標籤的文章。 顯示所有文章

2017年5月23日 星期二

Android Studio Git(bitbucket)

               
<一.>bitbucket部份:


(1.)到bitbucket後選取Repositories點選create repository
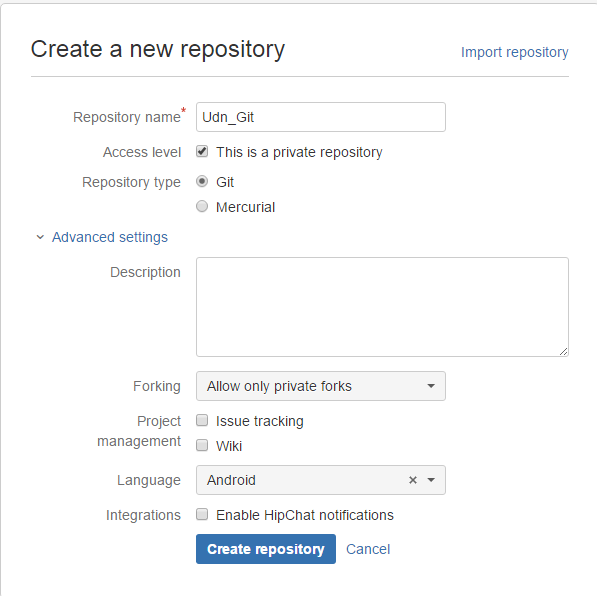
(Repository name不能設中文,要不然studio push時會出錯)


(2.)
創完後下面紅框部份等會在 push時用到


2016年6月2日 星期四

Android Scheme


在AndroidManifest 新增:

<intent-filter>
    <action android:name="android.intent.action.VIEW" />
    <category android:name="android.intent.category.DEFAULT" />
    <category android:name="android.intent.category.BROWSABLE" />
    <data        android:host="test"        android:scheme="test" />
</intent-filter>

加在你要的activity裡


在你Activity頁面新在下面那段就可接收值
getIntent().getData()   


2016年2月15日 星期一

Android Remove Fragment Page from ViewPager

 參考網址

The ViewPager doesn't remove your fragments with the code above because it loads several views (or fragments in your case) into memory. In addition to the visible view, it also loads the view to either side of the visible one. This provides the smooth scrolling from view to view that makes the ViewPager so cool.

To achieve the effect you want, you need to do a couple of things.

1. Change the FragmentPagerAdapter to a FragmentStatePagerAdapter. The reason for this is that the FragmentPagerAdapter will keep all the views that it loads into memory forever. Where the FragmentStatePagerAdapter disposes of views that fall outside the current and traversable views.

2. Override the adapter method getItemPosition (shown below). When we call mAdapter.notifyDataSetChanged(); the ViewPager interrogates the adapter to determine what has changed in terms of positioning. We use this method to say that everything has changed so reprocess all your view positioning.

And here's the code...


private class MyPagerAdapter extends FragmentStatePagerAdapter {

    //... your existing code

    @Override
    public int getItemPosition(Object object){
        return PagerAdapter.POSITION_NONE;
    }

}

2015年10月15日 星期四

Android Layout getHeight = 0問題解決

在onWindowFocusChanged取得就可以

@Override
 public void onWindowFocusChanged(boolean hasFocus) {
RelativeLayout.getHeight();

}

2015年7月22日 星期三

Android 相機 切換鏡頭

出處:http://stackoverflow.com/questions/16765527/android-switch-camera-when-button-clicked


Button otherCamera = (Button) findViewById(R.id.OtherCamera);

OtherCamera.setOnClickListener(new View.OnClickListener() {
@Override
public void onClick(View v) {
if (inPreview) {
    camera.stopPreview();
}
//NB: if you don't release the current camera before switching, you app will crash
camera.release();

//swap the id of the camera to be used
if(currentCameraId == Camera.CameraInfo.CAMERA_FACING_BACK){
    currentCameraId = Camera.CameraInfo.CAMERA_FACING_FRONT;
}
else {
    currentCameraId = Camera.CameraInfo.CAMERA_FACING_BACK;
}
camera = Camera.open(currentCameraId);

setCameraDisplayOrientation(CameraActivity.this, currentCameraId, camera);
try {

    camera.setPreviewDisplay(previewHolder);
} catch (IOException e) {
    e.printStackTrace();
}
camera.startPreview();
}
If you want to make the camera image show in the same orientation as the display, you can use the following code.
public static void setCameraDisplayOrientation(Activity activity,
         int cameraId, android.hardware.Camera camera) {
     android.hardware.Camera.CameraInfo info =
             new android.hardware.Camera.CameraInfo();
     android.hardware.Camera.getCameraInfo(cameraId, info);
     int rotation = activity.getWindowManager().getDefaultDisplay()
             .getRotation();
     int degrees = 0;
     switch (rotation) {
         case Surface.ROTATION_0: degrees = 0; break;
         case Surface.ROTATION_90: degrees = 90; break;
         case Surface.ROTATION_180: degrees = 180; break;
         case Surface.ROTATION_270: degrees = 270; break;
     }

     int result;
     if (info.facing == Camera.CameraInfo.CAMERA_FACING_FRONT) {
         result = (info.orientation + degrees) % 360;
         result = (360 - result) % 360;  // compensate the mirror
     } else {  // back-facing
         result = (info.orientation - degrees + 360) % 360;
     }
     camera.setDisplayOrientation(result);
 }

2015年6月16日 星期二

Android 變更Toast位置

Toast toast=Toast.makeText(mActivity,"test", Toast.LENGTH_LONG);
toast.setGravity(Gravity.CENTER_HORIZONTAL | Gravity.CENTER, 0, 0);
toast.show();

2015年5月21日 星期四

Android ScrollView + WebView Layout

<ScrollView
        android:id="@+id/my_scroll"
        android:layout_width="match_parent"
        android:layout_height="match_parent" >

        <LinearLayout
            android:layout_width="match_parent"
            android:layout_height="wrap_content"
            android:descendantFocusability="blocksDescendants"
            android:orientation="vertical" >

            <WebView
                android:id="@+id/my_web"
                android:layout_width="match_parent"
                android:layout_height="wrap_content"
                android:layout_marginTop="125dp" >
            </WebView>
        </LinearLayout>
    </ScrollView>

2015年4月15日 星期三

Android Wear 取消往左滑關閉功能

If the user interaction model of your app interferes with the swipe-to-dismiss gesture, you can disable it for your app. To disable the swipe-to-dismiss gesture in your app, extend the default theme and set theandroid:windowSwipeToDismiss attribute to false:
<style name="AppTheme" parent="Theme.DeviceDefault">
    <item name="android:windowSwipeToDismiss">false</item>
</style>

2015年3月10日 星期二

android post

new Thread(new Runnable(){
   @Override
   public void run() {
       // TODO Auto-generated method stub        
   
    POST("http://210.243.166.178/apps/Exhibition/api/getSpecificData.php");
   }          
}).start();


public static String POST(String url){
        InputStream inputStream = null;
        String result = "";
        try {

            // 1. create HttpClient
            HttpClient httpclient = new DefaultHttpClient();

            // 2. make POST request to the given URL
            HttpPost httpPost = new HttpPost(url);

            String json = "";

            // 3. build jsonObject
            JSONObject jsonObject = new JSONObject();
            jsonObject.accumulate("name","test");
            jsonObject.accumulate("number","001");

            // 4. convert JSONObject to JSON to String
            json = jsonObject.toString();

            // ** Alternative way to convert Person object to JSON string usin Jackson Lib
            // ObjectMapper mapper = new ObjectMapper();
            // json = mapper.writeValueAsString(person);

            // 5. set json to StringEntity
            StringEntity se = new StringEntity(json);

            // 6. set httpPost Entity
            httpPost.setEntity(se);

            // 7. Set some headers to inform server about the type of the content
            httpPost.setHeader("Accept", "application/json");
            httpPost.setHeader("Content-type", "application/json");

            // 8. Execute POST request to the given URL
            HttpResponse httpResponse = httpclient.execute(httpPost);

            // 9. receive response as inputStream
            inputStream = httpResponse.getEntity().getContent();

            // 10. convert inputstream to string
            if(inputStream != null)
                result = convertInputStreamToString(inputStream);
            else
                result = "Did not work!";
         
            Log.d("ddddd", "ddddd result:"+result);

        } catch (Exception e) {
            Log.d("InputStream", e.getLocalizedMessage());
        }

        // 11. return result
        return result;
    }
private static String convertInputStreamToString(InputStream inputStream) throws IOException{
       BufferedReader bufferedReader = new BufferedReader( new InputStreamReader(inputStream));
       String line = "";
       String result = "";
       while((line = bufferedReader.readLine()) != null)
           result += line;

       inputStream.close();
       return result;

   }

2015年3月4日 星期三

Android 發出嗶聲

ToneGenerator toneG = new ToneGenerator(AudioManager.STREAM_ALARM, 100);
toneG.startTone(ToneGenerator.TONE_CDMA_ALERT_CALL_GUARD, 200);

2015年2月8日 星期日

Android internal storage file

//save

public static boolean storeInsideImage(Context context, Bitmap image, String filepath, String filename) {


 File infilepath = new File(context.getFilesDir().getAbsoluteFile(), filepath);
 if (!infilepath.exists()) {
  infilepath.mkdirs();
 }

 try {

  File imgfile = new File(infilepath, filename);
  if (!imgfile.exists()){
   imgfile.createNewFile();
  }
  FileOutputStream fileOutputStream = new FileOutputStream(imgfile);
  BufferedOutputStream bos = new BufferedOutputStream(fileOutputStream);
  // choose another format if PNG doesn't suit you
  image.compress(CompressFormat.JPEG, 100, fileOutputStream);
//   fileOutputStream.flush();
//   fileOutputStream.close();
  bos.flush();
  bos.close();
  return true;
 } catch (FileNotFoundException e) {
  Log.w("TAG", "Error saving image file: " + e.getMessage());
  return false;
 } catch (IOException e) {
  Log.w("TAG", "Error saving image file: " + e.getMessage());
  return false;
 }
 }


//load & delete

private void loadImageFromStorage(String path)
{

   try {
    //先刪除上一張
    //File dir = getFilesDir();
    File file = new File("/data/data/com.udn.nm.food/files/GoodFood/data/Files", "login.jpg");
    boolean deleted = file.delete();
    Log.d("ddddddd", "ddddddd deleted"+deleted);
   
       File f=new File(path, "login.jpg");

       Bitmap b = BitmapFactory.decodeStream(new FileInputStream(f));
       if(b !=null){
        imageView1.setImageBitmap(b);
       }
       else{
        imageView1.setBackgroundResource(R.drawable.login_bg);
       }
     
         //  ImageView img=(ImageView)findViewById(R.id.imgPicker);
      // img.setImageBitmap(b);
   }
   catch (FileNotFoundException e)
   {
    imageView1.setBackgroundResource(R.drawable.login_bg);
       e.printStackTrace();
   }

}

}


2015年1月22日 星期四

Android不讓弹出鍵盤擋住View

AndroidManifest.xml 加adjustPan
 <activity
....
....
.
 android:windowSoftInputMode="adjustPan"

</activity>

2015年1月14日 星期三

Android update ViewPager View


@Override
public Object instantiateItem(ViewGroup container, int position) {
    View view = null;
    view = mInflater.inflate(R.layout.record_list_layout, null);          
    TextView test= (TextView) view.findViewById(R.id.test);
    String key = "test" + position;

    test.setTag(key);
  ((ViewPager) arg0).addView(view );
    return view;
}

//0為第一筆
TextView test= myViewPager.findViewWithTag("test0");
// 更新內容
if (test!= null ) {
    test.setText("update");
}

2015年1月5日 星期一

android viewpager setting destroy


in revision 4 of the Support Package, a method was added to ViewPager which allows you to specify the number of offscreen pages to use, rather than the default which is 1.
In your case, you want to specify 2, so that when you are on the third page, the first one is not destroyed, and vice-versa.
mViewPager = (ViewPager)findViewById(R.id.pager);
mViewPager.setOffscreenPageLimit(2);

2014年12月30日 星期二

Android get device ID

import android.provider.Settings.Secure;

private String android_id = Secure.getString(getContext().getContentResolver(),
                                                        Secure.ANDROID_ID); 

2014年12月25日 星期四

android fragment 傳值

public class A   extends Fragment {

B  b= new B();
 Bundle bundle = new Bundle();
 bundle.putString("test","test");
 b.setArguments(bundle);
}


public class  B  extends Fragment {
  Bundle bundle = getArguments();
  String test = bundle.getString("test");
  Log.i("test", test);

}