<一.>bitbucket部份:
(1.)到bitbucket後選取Repositories點選create repository
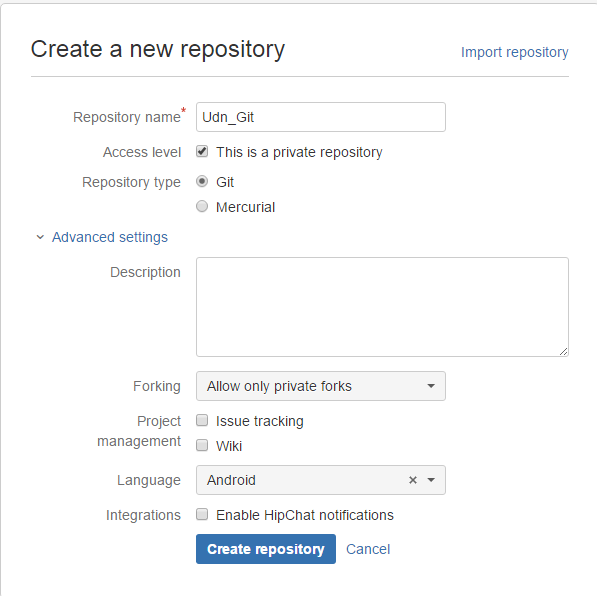
(Repository name不能設中文,要不然studio push時會出錯)
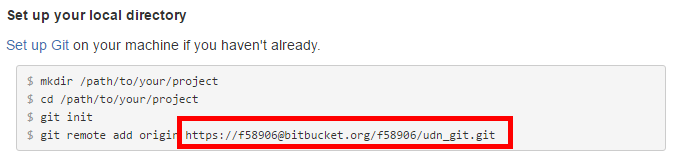
(2.)
創完後下面紅框部份等會在 push時用到
/**
 * Uses a combination of a PageTransformer and swapping X & Y coordinates
 * of touch events to create the illusion of a vertically scrolling ViewPager.
 *
 * Requires API 11+
 *
 */
public class VerticalViewPager extends ViewPager {

    public VerticalViewPager(Context context) {
        super(context);
        init();
    }

    public VerticalViewPager(Context context, AttributeSet attrs) {
        super(context, attrs);
        init();
    }

    private void init() {
        // The majority of the magic happens here
        setPageTransformer(true, new VerticalPageTransformer());
        // The easiest way to get rid of the overscroll drawing that happens on the left and right
        setOverScrollMode(OVER_SCROLL_NEVER);
    }

    private class VerticalPageTransformer implements ViewPager.PageTransformer {

        @Override
        public void transformPage(View view, float position) {

            if (position < -1) { // [-Infinity,-1)
                // This page is way off-screen to the left.
                view.setAlpha(0);

            } else if (position <= 1) { // [-1,1]
                view.setAlpha(1);

                // Counteract the default slide transition
                view.setTranslationX(view.getWidth() * -position);

                //set Y position to swipe in from top
                float yPosition = position * view.getHeight();
                view.setTranslationY(yPosition);

            } else { // (1,+Infinity]
                // This page is way off-screen to the right.
                view.setAlpha(0);
            }
        }
    }

    /**
     * Swaps the X and Y coordinates of your touch event.
     */
    private MotionEvent swapXY(MotionEvent ev) {
        float width = getWidth();
        float height = getHeight();

        float newX = (ev.getY() / height) * width;
        float newY = (ev.getX() / width) * height;

        ev.setLocation(newX, newY);

        return ev;
    }

    @Override
    public boolean onInterceptTouchEvent(MotionEvent ev){
        boolean intercepted = super.onInterceptTouchEvent(swapXY(ev));
        swapXY(ev); // return touch coordinates to original reference frame for any child views
        return intercepted;
    }

    @Override
    public boolean onTouchEvent(MotionEvent ev) {
        return super.onTouchEvent(swapXY(ev));
    }
<intent-filter>
    <action android:name="android.intent.action.VIEW" />
    <category android:name="android.intent.category.DEFAULT" />
    <category android:name="android.intent.category.BROWSABLE" />
    <data        android:host="test"        android:scheme="test" />
</intent-filter>
加在你要的activity裡
在你Activity頁面新在下面那段就可接收值
getIntent().getData()
Button otherCamera = (Button) findViewById(R.id.OtherCamera);

OtherCamera.setOnClickListener(new View.OnClickListener() {
@Override
public void onClick(View v) {
if (inPreview) {
    camera.stopPreview();
}
//NB: if you don't release the current camera before switching, you app will crash
camera.release();

//swap the id of the camera to be used
if(currentCameraId == Camera.CameraInfo.CAMERA_FACING_BACK){
    currentCameraId = Camera.CameraInfo.CAMERA_FACING_FRONT;
}
else {
    currentCameraId = Camera.CameraInfo.CAMERA_FACING_BACK;
}
camera = Camera.open(currentCameraId);

setCameraDisplayOrientation(CameraActivity.this, currentCameraId, camera);
try {

    camera.setPreviewDisplay(previewHolder);
} catch (IOException e) {
    e.printStackTrace();
}
camera.startPreview();
}
If you want to make the camera image show in the same orientation as the display, you can use the following code.
public static void setCameraDisplayOrientation(Activity activity,
         int cameraId, android.hardware.Camera camera) {
     android.hardware.Camera.CameraInfo info =
             new android.hardware.Camera.CameraInfo();
     android.hardware.Camera.getCameraInfo(cameraId, info);
     int rotation = activity.getWindowManager().getDefaultDisplay()
             .getRotation();
     int degrees = 0;
     switch (rotation) {
         case Surface.ROTATION_0: degrees = 0; break;
         case Surface.ROTATION_90: degrees = 90; break;
         case Surface.ROTATION_180: degrees = 180; break;
         case Surface.ROTATION_270: degrees = 270; break;
     }

     int result;
     if (info.facing == Camera.CameraInfo.CAMERA_FACING_FRONT) {
         result = (info.orientation + degrees) % 360;
         result = (360 - result) % 360;  // compensate the mirror
     } else {  // back-facing
         result = (info.orientation - degrees + 360) % 360;
     }
     camera.setDisplayOrientation(result);
 }